Programming Assignment 1 - Simple Router
Introduction
In this assignment you will develop a simple router (SR) with a static routing table. Your router must receive raw Ethernet frames, process the packets like a real router, and forward them to the correct outgoing interface. We will make sure you receive the Ethernet frames; your job is to create the forwarding logic so that the packets are forwarded to the correct interface.
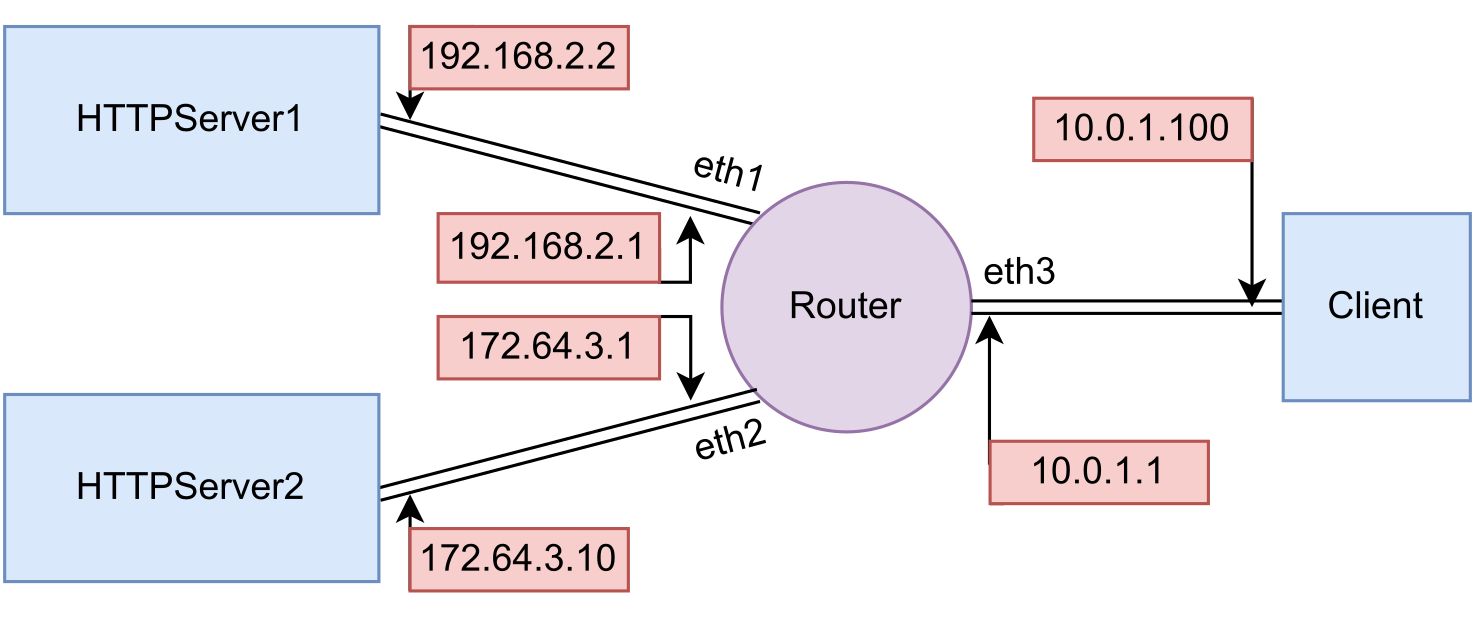
Your router must route real packets from an emulated host (client) to two emulated application servers (http_server 1 and 2) sitting behind your router. Each of the application servers runs an HTTP server. When you have completed the forwarding path of your router, you should be able to access these servers using regular client software. In addition, you should be able to ping and traceroute to and through a functioning Internet router. A sample routing topology is shown below:
If the router is working correctly, all of the following operations should work:
- Pinging from the client to any of the router's interfaces (192.168.2.1, 172.64.3.1, 10.0.1.1),
- Tracepathing from the client to any of the router's interfaces,
- Pinging from the client to any of the app servers (192.168.2.2, 172.64.3.10),
- Tracepathing from the client to any of the app servers, and
- Downloading a file using HTTP from one of the app servers,
Additional requirements are laid out in the 'Required Functionality' section.
Mininet
This assignment runs on top of Mininet, which allows you to emulate a topology on a single machine. It provides the needed isolation between the emulated nodes so that your router node can process and forward real Ethernet frames between the hosts. You don't have to know how Mininet works to complete this assignment, but more information about Mininet is available at http://mininet.org (if you are curious).
Get Started
To do the assignment you will need the VM loaded with Mininet and the required dependencies of the assignment. Check the VM Setup page for information on how to access this VM. Note that the username/password for this VM is mininet/mininet.
Starter code and configuration
To check out the starter code, configure the environment, and set up the modules you need for the controller, run the following commands:cd ~
git clone https://github.com/csc458-uoft/pa1
cd pa1/
./run_config.shSetting up the emulator
At this stage, you need 3 terminals for the controller, Mininet, and router. Assuming you already have one, spin up two more terminals before you continue.-
Controller: Mininet requires a controller, which we implemented on top of POX. POX is already available in the VMs and the modules were configured in the previous steps. To run the controller, run the following command in the first terminal:
cd ~/pa1/
ln -s ../pox
./run_pox.sh
You should see the following output:
POX 0.0.0 / Copyright 2011 James McCauley
DEBUG:.home.mininet.pa1.pox_module.csc458.ofhandler:*** ofhandler:
Successfully loaded ip settings for hosts
{'server1': '192.168.2.2', 'sw0-eth3': '10.0.1.1',
'sw0-eth1': '192.168.2.1', 'sw0-eth2': '172.64.3.1',
'client': '10.0.1.100', 'server2': '172.64.3.10'}

INFO:.home.mininet.pa1.pox_module.csc458.srhandler:created server
DEBUG:.home.mininet.pa1.pox_module.csc458.srhandler:SRServerListener
listening on 8888
DEBUG:core:POX 0.0.0 going up...
DEBUG:core:Running on CPython (2.7.12/Mar 1 2021 11:38:31)
INFO:core:POX 0.0.0 is up.
This program comes with ABSOLUTELY NO WARRANTY.  This program is
free software, and you are welcome to redistribute it under certain
conditions. Type 'help(pox.license)' for details.
DEBUG:openflow.of_01:Listening for connections on 0.0.0.0:6633
Ready.
POX>
Let the controller do its job and switch to the next terminal.
-
Mininet: In the second terminal, start Mininet emulator by running the commands
cd ~/pa1/
./run_mininet.sh
which should give you the following output:
*** Shutting down stale SimpleHTTPServers
*** Shutting down stale webservers
server1 192.168.2.2
server2 172.64.3.10
client 10.0.1.100
sw0-eth1 192.168.2.1
sw0-eth2 172.64.3.1
sw0-eth3 10.0.1.1
*** Successfully loaded ip settings for hosts
{'server1': '192.168.2.2', 'sw0-eth3': '10.0.1.1',
'sw0-eth1': '192.168.2.1', 'sw0-eth2': '172.64.3.1',
'client': '10.0.1.100', 'server2': '172.64.3.10'}
*** Creating network
*** Creating network
*** Adding controller
Unable to contact the remote controller at 127.0.0.1:6653
Connecting to remote controller at 127.0.0.1:6633
*** Adding hosts:
client server1 server2
*** Adding switches:
sw0
*** Adding links:
(client, sw0) (server1, sw0) (server2, sw0)
*** Configuring hosts
client server1 server2
*** Starting controller
c0
*** Starting 1 switches
sw0 ...
*** setting default gateway of host server1
server1 192.168.2.1
*** setting default gateway of host server2
server2 172.64.3.1
*** setting default gateway of host client
client 10.0.1.1
*** Starting SimpleHTTPServer on host server1
*** Starting SimpleHTTPServer on host server2
*** Starting CLI:
mininet>
Note that if you switch back to the controller terminal, you will see that the mininet instance has connected itself to the controller:
INFO:openflow.of_01:[Con 1/47025279513920]
Connected to 2a-c4-ed-14-b5-40
DEBUG:.home.mininet.pa1.pox_module.csc458.ofhandler:Connection
[Con 1/47025279513920]
DEBUG:.home.mininet.pa1.pox_module.csc458.srhandler:SRServerListener
catch RouterInfo even, info={
'eth3': ('10.0.1.1', '8e:5a:1f:45:ce:90', '10Gbps', 3),
'eth2': ('172.64.3.1', 'ca:67:4f:02:e4:6b', '10Gbps', 2),
'eth1': ('192.168.2.1', 'ca:91:bf:78:1e:7d', '10Gbps', 1)},
rtable=[('10.0.1.100', '10.0.1.100', '255.255.255.255', 'eth3'),
('192.168.2.2', '192.168.2.2', '255.255.255.255', 'eth1'),
('172.64.3.10', '172.64.3.10', '255.255.255.255', 'eth2')]
Keep the emulator running and switch to the next terminal.
-
Router: The final component you need is the router. To help you with debugging, we have provided you with the executable binary of the solution for the router in the
sr_solutionfile. Note that your ultimate goal in this assignment is to implement the router's logic and compile it into an executable just like this. In the third terminal, execute the binary file of the solution by running
which will output the following:cd ~/pa1/ ./sr_solutionUsing VNS sr stub code revised 2009-10-14 (rev 0.20) Loading routing table from server, clear local routing table. Loading routing table --------------------------------------------- Destination Gateway Mask Iface 10.0.1.100 10.0.1.100 255.255.255.255 eth3 192.168.2.2 192.168.2.2 255.255.255.255 eth1 172.64.3.10 172.64.3.10 255.255.255.255 eth2 --------------------------------------------- Client mininet connecting to Server localhost:8888 Requesting topology 0 successfully authenticated as mininet Loading routing table from server, clear local routing table. Loading routing table --------------------------------------------- Destination Gateway Mask Iface 10.0.1.100 10.0.1.100 255.255.255.255 eth3 192.168.2.2 192.168.2.2 255.255.255.255 eth1 172.64.3.10 172.64.3.10 255.255.255.255 eth2 --------------------------------------------- Router interfaces: eth3 HWaddr8e:5a:1f:45:ce:90 inet addr 10.0.1.1 eth2 HWaddrca:67:4f:02:e4:6b inet addr 172.64.3.1 eth1 HWaddrca:91:bf:78:1e:7d inet addr 192.168.2.1 <-- Ready to process packets -->
Test Connectivity of Your Emulated Topology
Now that you have all the necessary components, you can test out the connectivity of the environment setup. In our setup, 192.168.2.2 is the IP for server1, and 192.168.2.2 is the IP for server2. You can find the IP addresses in your IP_CONFIG file.
Now, switch back to the terminal where Mininet is running. To issue an command on the emulated host, type the hostname (server1, server2, or client) followed by the command in the Mininet console. The following tests can be useful:
-
Ping Test: You can test the accessibility of the nodes to each other with the ping command. For example, to test that between
clientandserver1you canmininet> client ping -c 3 192.168.2.2 PING 192.168.2.2 (192.168.2.2) 56(84) bytes of data. 64 bytes from 192.168.2.2: icmp_req=1 ttl=63 time=66.9 ms 64 bytes from 192.168.2.2: icmp_req=2 ttl=63 time=49.9 ms 64 bytes from 192.168.2.2: icmp_req=3 ttl=63 time=68.8 ms
You can check the output created by -
Tracepath Test:You can use tracepath (or traceroute) to see the route used between nodes:
mininet> client tracepath -n 192.168.2.2 1?: [LOCALHOST] pmtu 1500 1: 10.0.1.1 38.445ms asymm 29 1: 10.0.1.1 46.965ms asymm 29 2: 192.168.2.2 130.594ms reached Resume: pmtu 1500 hops 2 back 2 -
Webserver test: Finally, to test the web server is properly working at the
server1andserver2, issue an HTTP request by using wget or curl.mininet> client wget http://192.168.2.2 --2022-08-25 08:10:45-- http://192.168.2.2/ Connecting to 192.168.2.2:80... connected. HTTP request sent, awaiting response... 200 OK Length: 161 [text/html] Saving to: ‘index.html’ 100%[======================================>] 161 --.-K/s in 0s 2022-08-25 08:10:46 (16.9 MB/s) - ‘index.html’ saved [161/161]
sr_solution and the controller as a result of the generated packets.
Note (or test) that if you stop sr_solution, the ping/tracepath/wget won't work anymore. In this assignment, you will replicate the functionality of sr_solution. To help you get started, we provide some starter code described in the following section..
Starting the assignment
With the bigger picture in mind, you can now focus on building and running your own router.
There are two configuration files you need to know about:
-
IP_CONFIG: Listed out the IP addresses assigned to the emulated hosts.
> cat ~/pa1/IP_CONFIG server1 192.168.2.2 server2 172.64.3.10 client 10.0.1.100 sw0-eth1 192.168.2.1 sw0-eth2 172.64.3.1 sw0-eth3 10.0.1.1 -
router/rtable(also linked to~/pa1/rtable): The static routing table used for the simple router.> cat ~/pa1/rtable 10.0.1.100 10.0.1.100 255.255.255.255 eth3 192.168.2.2 192.168.2.2 255.255.255.255 eth1 172.64.3.10 172.64.3.10 255.255.255.255 eth2
The starter router code
You can build and run the skeleton of the router with:
cd ~/pa1/router/
make
./sr
General Forwarding Logic
To get you started, an outline of the forwarding logic for a router follows, although it does not contain all the details. There are two main parts to this assignment: IP forwarding, and handling ARP (address resolution).
IP Forwarding: Given a raw Ethernet frame, if the frame contains an IP packet that is not destined for one of our interfaces:
- Sanity-check the packet (meets minimum length and has correct checksum).
- Decrement the TTL by 1, and recompute the packet checksum over the modified header.
- Find out which entry in the routing table has the longest prefix match with the destination IP address.
- Check the ARP cache for the next-hop MAC address corresponding to the next-hop IP. If it’s there, send it. Otherwise, send an ARP request for the next-hop IP (if one hasn’t been sent within the last second), and add the packet to the queue of packets waiting on this ARP request.
Obviously, this is a very simplified version of the forwarding process, and the low-level details follow. For example, if an error occurs in any of the above steps, you will have to send an ICMP message back to the sender notifying them of an error. You may also get an ARP request or reply, which has to interact with the ARP cache correctly.
Protocols to Understand
Ethernet
You are given a raw Ethernet frame and have to send raw Ethernet frames. You should understand source and destination MAC addresses and the idea that we forward a packet one hop by changing the destination MAC address of the forwarded packet to the MAC address of the next hop’s incoming interface.
Internet Protocol
Before operating on an IP packet, you should verify its checksum and make sure it meets the minimum length of an IP packet. You should understand how to find the longest prefix match of a destination IP address in the routing table described in the “Getting Started” section. If you determine that a datagram should be forwarded, you should correctly decrement the TTL field of the header and recompute the checksum over the changed header before forwarding it to the next hop.
Internet Control Message Protocol
ICMP is a simple protocol that can send control information to a host. In this assignment, your router will use ICMP to send messages back to a sending host. You will need to properly generate the following ICMP messages (including the ICMP header checksum) in response to the sending host under the following conditions:
| Name | Type | Code | Explanation |
|---|---|---|---|
| Echo reply | 0 | - | Sent in response to an echo request (ping) to one of the router’s interfaces. (This is only for echo requests to any of the router’s IPs. An echo request sent elsewhere should be forwarded to the next hop address as usual.) |
| Destination net unreachable | 3 | 0 | Sent if there is a non-existent route to the destination IP (no matching entry in the routing table when forwarding an IP packet). |
| Destination host unreachable | 3 | 1 | Sent if five ARP requests were sent to the next-hop IP without a response. |
| Port unreachable | 3 | 3 | Sent if an IP packet containing a UDP or TCP payload is sent to one of the router’s interfaces. This is needed for traceroute to work. |
| Time exceeded | 11 | 0 | Sent if an IP packet is discarded during processing because the TTL field is 0. This is also needed for traceroute to work. |
The source address of an ICMP message can be the source address of any of the incoming interfaces, as specified in RFC 792. As mentioned above, the only incoming ICMP message destined towards the router's IPs that you have to explicitly process are ICMP echo requests. You may want to create additional structs for ICMP messages for convenience, but make sure to use the packed attribute so that the compiler doesn't try to align the fields in the struct to word boundaries.
Address Resolution Protocol
ARP is needed to determine the next-hop MAC address that corresponds to the next-hop IP address stored in the routing table. Without the ability to generate an ARP request and process ARP replies, your router would not be able to fill out the destination MAC address field of the raw Ethernet frame you are sending over the outgoing interface. Analogously, without the ability to process ARP requests and generate ARP replies, no other router could send your router Ethernet frames. Therefore, your router must generate and process ARP requests and replies.
To reduce the number of ARP requests you send, you must cache ARP replies. Cache entries should time out after 15 seconds to minimize staleness. The provided ARP cache class already times the entries out for you.
When forwarding a packet to a next-hop IP address, the router should first check the ARP cache for the corresponding MAC address before sending an ARP request. In the case of a cache miss, an ARP request should be sent to a target IP address about once every second until a reply comes in. If the ARP request is sent five times with no reply, an ICMP destination host unreachable is sent back to the source IP as stated above. The provided ARP request queue will help you manage the request queue.
In the case of an ARP request, you should only send an ARP reply if the target IP address is one of your router’s IP addresses. In the case of an ARP reply, you should only cache the entry if the target IP address is one of your router’s IP addresses.
Note that ARP requests are sent to the broadcast MAC address (ff-ff-ff-ff-ff-ff). ARP replies are sent directly to the requester’s MAC address.
IP Packet Destinations
An incoming IP packet may be destined for one of your router’s IP addresses, or it may be destined elsewhere. If it is sent to one of your router’s IP addresses, you should take the following actions, consistent with the section on protocols above:
- If the packet is an ICMP echo request and its checksum is valid, send an ICMP echo reply to the sending host.
- If the packet contains a TCP or UDP payload, send an ICMP port unreachable to the sending host.
Otherwise, ignore the packet.
Packets destined elsewhere should be forwarded using your normal forwarding logic.
Code Overview
Basic Functions
Your router receives a raw Ethernet frame and sends raw Ethernet frames when sending a reply to the sending host or forwarding the frame to the next hop. The basic functions to handle these functions are:
void sr_handlepacket(struct sr_instance* sr, uint8_t * packet, unsigned int len, char* interface)This method, located in sr_router.c, is called by the router each time a packet is received. The “packet” argument points to the packet buffer which contains the full packet including the ethernet header. The name of the receiving interface is passed into the method as well.
int sr_send_packet(struct sr_instance* sr, uint8_t* buf, unsigned int len, const char* iface)This method, located in sr_vns_comm.c, will send an arbitrary packet of length, len, to the network out of the interface specified by iface.
You should not free the buffer given to you in sr_handlepacket (this is why the buffer is labeled as being “lent” to you in the comments). You are responsible for doing correct memory management on the buffers that sr_send_packet borrows from you (that is, sr_send_packet will not call free on the buffers that you pass it).
void sr_arpcache_sweepreqs(struct sr_instance *sr)The assignment requires you to send an ARP request about once a second until a reply comes back or we have sent five requests. This function is defined in sr_arpcache.c and called every second, and you should add code that iterates through the ARP request queue and resends any outstanding ARP requests that haven’t been sent in the past second. If an ARP request has been sent 5 times with no response, a destination host unreachable should go back to all the senders of packets that were waiting on a reply to this ARP request.
Data Structures
The Router (sr_router.h):
The full context of the router is kept in the struct sr_instance(sr_router.h). sr_instance contains information about the topology the router is routing for as well as the routing table and the list of interfaces.
Interfaces (sr_if.c/h):
After connecting, the server will send the client the hardware information for that host. The stub code uses this to create a linked list of interfaces in the router instance at member if_list. Utility methods for handling the interface list can be found at sr_if.c/h.
The Routing Table (sr_rt.c/h):
The routing table in the stub code is read on from a file (default filename “rtable”, can be set with command line option -r ) and stored in a linked list of routing entries in the current routing instance (member routing_table).
The ARP Cache and ARP Request Queue (sr_arpcache.c/h):
You will need to add ARP requests and packets waiting on responses to those ARP requests to the ARP request queue. When an ARP response arrives, you will have to remove the ARP request from the queue and place it onto the ARP cache, forwarding any packets that were waiting on that ARP request. Pseudocode for these operations is provided in sr_arpcache.h. The base code already creates a thread that times out ARP cache entries 15 seconds after they are added for you. You must fill out the sr_arpcache_sweepreqs function in sr_arpcache.c that gets called every second to iterate through the ARP request queue and re-send ARP requests if necessary. Pseudocode for this is provided in sr_arpcache.h.
Protocol Headers (sr_protocol.h)
Within the router framework you will be dealing directly with raw Ethernet packets. The stub code itself provides some data structures in sr_protocols.h which you may use to manipulate headers easily.
Several resources describe the protocol headers in detail. Here are some general useful pointers:
For the actual specifications, there are also the RFC’s for ARP (RFC826), IP (RFC791), and ICMP (RFC792).
Required Functionality
- The router must successfully route packets between the Internet and the application servers.
- The router must correctly handle ARP requests and replies.
- The router must correctly handle traceroutes through it (where it is not the end host) and to it (where it is the end host).
- The router must respond correctly to ICMP echo requests.
- The router must handle TCP/UDP packets sent to one of its interfaces. In this case, the router should respond with an ICMP port unreachable.
- The router must maintain an ARP cache whose entries are invalidated after a timeout period (timeouts should be on the order of 15 seconds).
- The router must queue all packets waiting for outstanding ARP replies. If a host does not respond to 5 ARP requests, the queued packet is dropped and an ICMP host unreachable message is sent back to the source of the queued packet.
- The router must not needlessly drop packets (for example when waiting for an ARP reply)
- The router must enforce guarantees on timeouts–that is, if an ARP request is not responded to within a fixed period of time, the ICMP host unreachable message is generated even if no more packets arrive at the router. (Note: You can guarantee this by implementing the
sr_arpcache_sweepreqsfunction insr_arpcache.ccorrectly.)
Deliverables
-
Compress all content of the
router directory, name it as pa1.tar.gz, and submit it to markus.
There is a rule named
compress in the provided Makefile (inside the router directory), which will do the compression for you. You just need to run
make compresspa1.tar.gz file for you. By default, this command will add the README, Makefile, .c, and .h files to the archive. If you wish to add more files to your submission, you should add them to the end of the tar command under the compress rule in the Makefile.
For the auto-tester to work, your submitted files should create the
sr executable as a result of simply running make on them.
Final Notes
Logging Packets
You can log the packets received and generated by your SR program by using the “-l” parameter with your SR program. The file will be in pcap format, i.e., you can use Wireshark or tcpdump to read it.
./sr -l logname.pcapDebugging Functions
We have provided you with some basic debugging functions in sr_utils.h, sr_utils.c. Feel free to use them to print out network header information from your packets. Below are some functions you may find useful:
print_hdrs(uint8_t *buf, uint32_t length)- Prints out all possible headers starting from the Ethernet header in the packetprint_addr_ip_int(uint32_t ip)- Prints out a formatted IP address from a uint32_t. Make sure you are passing the IP address in the correct byte ordering.
Length of Assignment
This assignment requires a significant amount of time to complete, so get started early. To Give you a rough idea of the size of the assignment, we added 520 lines of C, including whitespace and comments in our reference solution:
> wc -l ~/pa1/router/*.c | tail -1
1585 total
> wc -l ~/pa1/router/solution/*.c | tail -1
2104 total
Tools
There are several tools that can make your life considerably easier.
makeis a utility used to conditionally recompile your program based on the timestamps of the source code, object files, and executable. We expect that everyone in the class will have seen a makefile before as they are a permanent fixture of every flavor of Unix and most other platforms. If you don't know how to use make or write a makefile, learn. We require a makefile to be submitted with each assignment.gdbis the GNU debugger. gdb is an interactive, source-level debugger. It allows you to trace through your code as it executes and examine the program state. If your program seg faults, it will show you where. Learning to use gdb effectively will save you many hours of debugging hell. To compile with gdb, simply add the '-g' flag to thegcccommand. You can then start gdb with your program with the commandgdb progname. Type 'help' from the gdb prompt for more information.Valgrindis a programming tool for finding memory leaks and memory errors. Use Valgrind to ensure that your program is not leaking memory and that there aren't potential segfaults lurking in your code. The basic procedure for running valgrind is to run the commandvalgrind progname progarg1 progarg2..., whereprognameis the name of the program andprogarg1, etc. are arguments to the program. Runvalgrind --helpfor additional options- most of the things that you will be interested in will be in the Memcheck module.