Yujia Li |
|
NetVis - Making Network Visuaulization Easy
NetVis is a simple and easy to use tool to visualize network built with OpenFlow switches. It is implemented using Python based on the POX API and tested on Mininet 1.0. Further testing may be necessary if you want to use it on real networks.Download NetVis source files and project report.
Run NetVis
Before running NetVis, you should first make sure you have OpenFlow and POX installed correctly. If you don't have them, you can choose to download a system image file that contains all the required software or follow instructions to install OpenFlow and POX.
Note: (1) NetVis is tested on the 32-bit VirtualBox VM Image with Mininet 1.0; (2) There are a few different versions of POX available now, NetVis is tested with the "master" branch; (3) if you have problems running NetVis on your own system, please first try to run it in the VM image, then compare the system config in the VM image with your own system to see what made a difference.
The current version of NetVis is tested using Mininet 1.0. Mininet is a nice tool to allow you simulate a whole network on your computer. Mininet 1.0 is included in the system image file and Mininet 2.0 is now available.
After you got all the required softwares ready, uncompress the NetVis package. Then copy the ext directory and pox_netvis.py to $POX_HOME$, which is the root directory for POX on your system. Then go to $POX_HOME$, you can start NetVis using the following command:
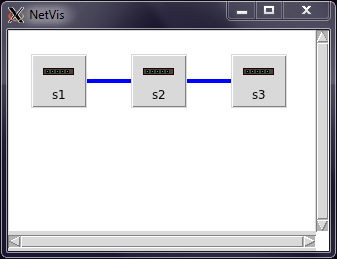
./pox_netvis.py --no_cli net_discoveryThen you can test the program on different network structures using Mininet. For example, the following command will start a network with 3 switches connected in a chain, and each switch has a host attached to it:
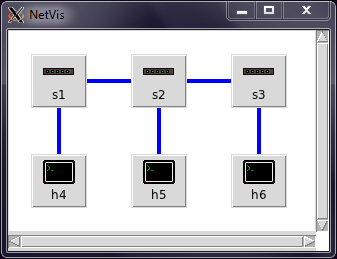
sudo mn --topo linear,3After the network is set up, you can see NetVis already detected all the switches. Then go back to the CLI interface of Mininet and do a pingall test. Now NetVis should have detected all hosts and connections.
 |
 |
|
| Fig.1 Network started | Fig.2 After a pingall test |
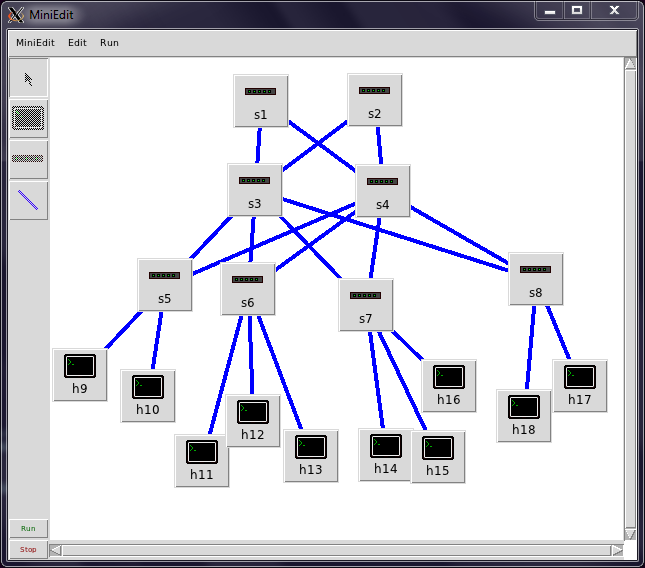
myminiedit is a nice tool to customize your own network in Mininet. It is based on the example program miniedit contained in the Mininet package, but slightly modified to allow you run CLI after created your network. You can start it by
sudo python myminiedit.pyIn myminiedit, you can create your own network by adding switches, hosts and links. After you finished editing, you can run the network and start CLI by clicking the 'Run' botton. Then when the network is started up, you can do a pingall test. NetVis should be able to detect all components in your network by then.
 |
 |
|
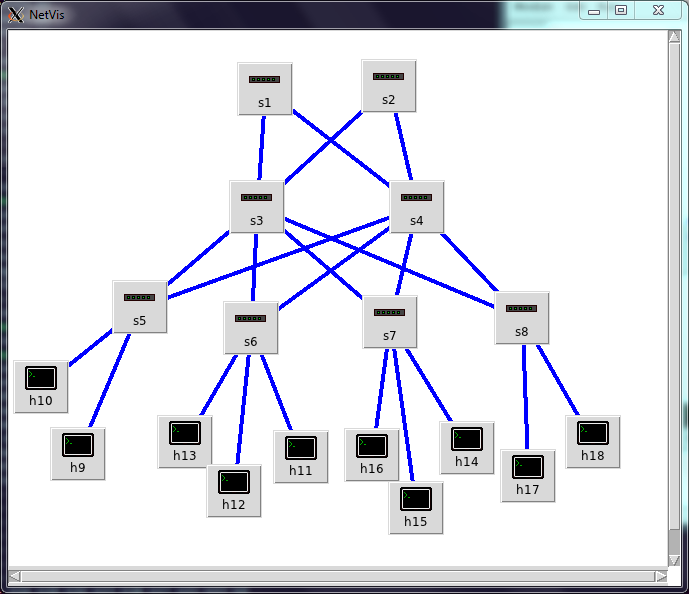
| Fig.3 Using myminiedit to create a network with 8 switches and 10 hosts. | Fig.4 NetVis detected all components and connections after a pingall test |
When you move your cursor on to a switch, a host or a link, a tooltip showing information (including MAC address, IP address and port number) about the component will be displayed.
Note that NetVis should be restarted before testing a new network. This problem may be resolved in a future version.
How it Works
NetVis use the OpenFlow protocol to send to and collect information from the switches. Using this information, NetVis is able to infer how the switches and hosts are connected.
According to the OpenFlow protocol, after the network is launched and the TLS connection between switches and the central controller is established, the controller will send OFPT_FEATURES_REQUEST message to the switches, asking for detailed information about each switch. Then each switch should reply with a OFPT_FEATURES_REPLY message, which contains the data path id of the switch, information about the ports on the switch and size of buffer, etc. After the controller received all the replies, NetVis will then create a switch node for each switch, and record all the information (e.g. MAC address) about the ports connected with that switch.
NetVis first detects the connections between switches. This is done by flooding ARP probe messages out of every port from every switch. An ARP probe message is an ARP request with all zero source IP address. These messages are only used to announce the MAC address of the sending port, and no replies are needed. When normal hosts received such ARP probe messages, they can simply ignore it. When another switch received such a message, it then knows it has a port that is connected to the port with the MAC address in the packet. It will send a OFPT_PACKET_IN message to the controller, the controller got the information about the sending port and the receiving port, therefore can create a link between them.
Note that OpenFlow protocol is a layer 2 protocol, the ports (i.e. network interfaces) of switches do not have an IP address. But they do have MAC addresses, these MAC addresses are their identifiers in the network.
The connections between switches and hosts are detected by doing ping tests from the hosts. In Mininet, the pingall command can be used to run a ping test between every pair of hosts. Whenever a packet from a host is received, the switch will know the MAC and IP addresses of the host (by inspecting the ARP or IP packets). This information is made available to the controller and NetVis by the OFPT_PACKET_IN message sent from the switch. After receiving packets from all hosts, NetVis should be able to recover the full network structure.
The information collected and displayed by NetVis are listed below
- Data path id of each switch, MAC address of all the ports on a switch. But no IP address for the ports.
- IP and MAC addresses of each host. But no unique data path id for the hosts.
- End points of every connection.