
Muuo Wambua


A research project I spent time working on during my master’s required me to scrape, index and rerank a largish number of websites. While Google would certainly offer better search results for most of the queries that we were interested in, they no longer offer a cheap and convenient way of creating custom search engines.
This need, along with the desire to own and manage my own data spurred me to set about finding a workflow for retrieving decent results for search queries made against a predefined list of websites. That workflow is described here, providing what I hope shall serve as a useful reference for how to go about setting up a small search engine using free and open-source tools.
Note:
• The instructions here assume that you use some UNIX-like operating system (Linux, MacOS, *BSD).
• Any Python code has only been tested using Python 3.7 (The clock is ticking).
• Any code provided is free to use under the MIT license.
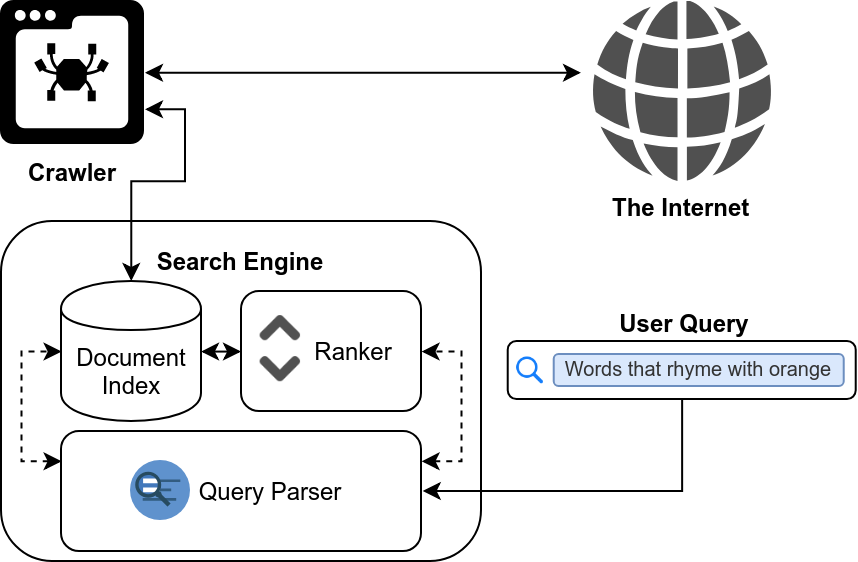
Commercial search engines are immensely complex feats of engineering. However, at the end of the day, most web search engines perform three basic functions: Crawling the web, Indexing the pages it crawls, and searching for documents in its index. We will walk through how to set up the various tools that provide this functionality. We also take a brief look at how to go about learning a better ranking function.
Reference: Nutch Tutorial
A crawler mostly does what its name suggests. It visits pages, consumes their resources, proceeds to visit all the websites that they link to, and then repeats the cycle until a specified crawl depth is reached. Apache Nutch is one of the more mature open-source crawlers currently available. While it’s not too difficult to write a simple crawler from scratch, Apache Nutch is tried and tested, and has the advantage of being closely integrated with Solr (The search platform we’ll be using).
There are two major releases of Apache Nutch with their releases versioned as 1.x and 2.x respectively. The later is more modern, however, it breaks compatibility with some of the features this tuturial uses. It is therefore advised that readers stick to 1.x releases.
After crawling, we will want to index the contents of the pages we index. We will use Apache Solr for this purpose, and at the time of writing the latest version of Nutch that is compatible with Solr is v1.14. See this page for the most recent Solr-Nutch compatibility table.
You’ll therefore want to proceed to download Apache Nutch 1.14 and Solr 6.6.*
wget http://mirror.dsrg.utoronto.ca/apache/lucene/solr/6.6.5/solr-6.6.5.tgz
wget http://apache.forsale.plus/nutch/1.14/apache-nutch-1.14-bin.tar.gz
tar xzf solr-6.6.5.tgz && rm solr-6.6.5.tgz && mv solr-6.6.5 solr
tar xzf apache-nutch-1.14-bin.tar.gz && rm apache-nutch-1.14-bin.tar.gz && mv apache-nutch-1.14 nutch
Add your agent name to nutch/conf/nutch-site.xml, and enable a bunch of plugins we’ll need. This name will be used to identify your crawler and will end up in a lot of log files, so give the name some thought.
Another important addition is indexer-solr. It will allow us to automatically add documents to Solr’s index as we crawl them.
<property>
 <name>http.agent.name</name>
 <value>CrawlerName</value>
</property>
<property>
 <name>plugin.includes</name>
 <value>protocol-http|urlfilter-(regex|validator)|parse-(html|tika)|index-(basic|anchor|more)|indexer-solr|scoring-opic|urlnormalizer-(pass|regex|basic)</value>
</property>
Modify nutch/conf/schema.xml (To be used when setting up Solr), and set indexed=true on the lastModified field. This modification instructs Solr to index the lastModified field, allowing us to later rank results based on their recency.
<field name="lastModified" type="date" stored="true" indexed="true"/>
The crawler will need a list of seed urls to start its crawl from. Creating this should be as easy as:
mkdir -p nutch/urls
touch nutch/urls/seed.txt
You can now edit nutch/urls/seed.txt and add the URLs of the sites you want Nutch to crawl.
If you’re reading this, you are probably not interested in indexing the entire web (yet); but rather a small segment of it. By carefully tailoring a list of seed urls and limiting the your crawl depth, you can control what content makes it into your index.
You can also exert finer control by configuring a regular expression filter (nutch/conf/regex-urlfilter.txt) that will let you limit Nutch’s exploration. (See this page for more details)
Reference: Nutch tutorial
Apache Solr is responsible for more than just maintaining a full-text index of the content that our crawler scrapes up. It also handles search queries, supporting a broad range of fairly sophisticated query parsers. Last of all, it is responsible for reordering the retrieved search results so that the most relevant results show up first.
You should have already downloaded a compatible version of Solr and unzipped it to <Project_Dir>/solr. The official Solr documentation should serve as a far better guide of how to setup Solr, but for now we will only need to carry out the following:
Create resources for a new solr core. A core is a single index with its associated logs and configuration files. It is a convenient abstraction that let’s us serve different indices from the same solr instance. The rest of this article assumed you named your core nutch, but you can name it whatever you like:
bash cp -r solr/server/solr/configsets/basic_configs solr/server/solr/configsets/nutch
Copy the nutch schema.xml into the conf directory. This ensures that Solr’s index matches Nutch’s output:
bash cp nutch/conf/schema.xml solr/server/solr/configsets/nutch/conf
Make sure that there is no managed-schema “in the way”. The managed-schema file is automatically updated when changes are made to the configuration via the Schema API, and its presence may cause Solr to ignore our schema.xml. (More details here)
bash rm solr/server/solr/configsets/nutch/conf/managed-schema
Enable the learning to rank (LTR) plugin (more on this later) by adding the following lines in between <config> and </config> in solr/server/solr/configsets/nutch/conf/solrconfig.xml:
  <lib dir="${solr.install.dir:../../../..}/contrib/ltr/lib/" regex=".*\.jar" />
  <lib dir="${solr.install.dir:../../../..}/dist/" regex="solr-ltr-\d.*\.jar" />

  <queryParser name="ltr" class="org.apache.solr.ltr.search.LTRQParserPlugin"/>

  <cache name="QUERY_DOC_FV"
          class="solr.search.LRUCache"
          size="4096"
          initialSize="2048"
          autowarmCount="4096"
          regenerator="solr.search.NoOpRegenerator" />

  <transformer name="features" class="org.apache.solr.ltr.response.transform.LTRFeatureLoggerTransformerFactory">
    <str name="fvCacheName">QUERY_DOC_FV</str>
  </transformer>
While you’re editing solrconfig.xml, make sure to change all instances of _text_ to text.
Start it with LTR enabled:
solr/bin/solr start -Dsolr.ltr.enabled=true
With the required software all setup, we can finally crawl our list of seed urls and index their contents into Solr. Crawling with nutch consists of a number of steps: i) Fetching, ii) Link Inversion, iii) Indexing, and iv) Duplicate Deletion & Cleaning. However, because we aren’t yet interested in incremental crawling and distributing crawling over multiple machines, we won’t be needing the more fine-grained control that these steps give us.
Fortunately, Nutch provides a script (nutch/bin/crawl) that lets us crawl and index the results into Solr simultaneously.
export JAVA_HOME=/usr/java/latest/
nutch/bin/crawl -i -D solr.server.url=http://localhost:8983/solr/nutch -s nutch/urls/ Crawl 2
Brief descriptions of each of the options we pass are below:
-i: Index results into solr-D solr.server.url: The URL of your solr index. You shouldn’t need to change this if you are running Solr on the same machine as Nutch, on its standard port and you named your index nutch.-s nutch/urls/: Where to look for text files with newline-delimited seed urls.Crawl: Where to store contents of crawled pages.2: The maximum crawl depthIt will take a while to finish the two rounds of crawling and indexing, after which you should be able to issue the following request to your Solr instance:
curl http://localhost:8983/solr/nutch/query?q=hello+world&fl=url,title
Now that we have a search engine setup, it’s worth noting that we’re still a far ways off from being at par with commercial search engines. One of the reasons why Google was able to work it’s way to the top of the search-engine foodchain is because they ranked search results in a far more intuitive way than their competition. Older readers might remember that Google’s PageRank algorithm gave them such a leg up over the competition that they would prompt users to compare its search results to those of (the then more popular) AltaVista and Yahoo. You can see it for yourself here.

This should prod us to ask the question of how we can go about improving the quality of our search results. Commercial search-engines such as Google do this by reranking their search results using a number of heuristics. Their original algorithm, page-rank, used statistics about a page’s incoming and outgoing links to determine its ‘popularity’ in the network. They now use all sorts of features for ranking: such as the users’ location, previous browsing histories… etc.
However, linguistic features still serve as good indicators of a document’s relevance to the original query. Though we will only be using a number of simple features in this article, this list of features put together by Microsoft Research for a shared ranking task should serve as a good reference for appropriate feature selection. Since these features do not provide a direct measure of documents’ relevance, it makes sense to try and learn how to factor them into our ranking process. This is known as learning to rank.
It’s worth noting that I can only provide a brief summary, and I would recommend this talk by Bloomberg for readers seeking a more detailed look at of reranking with Solr.
Reference: Solr LTR Tutorial
Define the features that Solr will use to rank retrieved search results, and save them in a file data/features.json. An example is provided below:
[
   {
    "store": "myfeature_store",
    "name" : "originalScore",
    "class" : "org.apache.solr.ltr.feature.OriginalScoreFeature",
    "params" : {}
   },
   {
    "store": "myfeature_store",
    "name" : "titleLength",
    "class" : "org.apache.solr.ltr.feature.FieldLengthFeature",
    "params" : {
   	"field":"title"
     }
   },
   {
    "store": "myfeature_store",
    "name" : "contentLength",
    "class" : "org.apache.solr.ltr.feature.FieldLengthFeature",
    "params" : {
   	"field":"content"
     }
   },
   {
   "store": "myfeature_store",
   "name": "titleScore",
   "class": "org.apache.solr.ltr.feature.SolrFeature",
   "params": {
	   "q":"{!dismax qf=title} ${query}"
   }
   },
   {
   "store": "myfeature_store",
   "name": "contentScore",
   "class": "org.apache.solr.ltr.feature.SolrFeature",
   "params": {
	   "q":"{!dismax qf=content} ${query}"
   }
   },
   {
   "store": "myfeature_store",
   "name": "freshness",
   "class": "org.apache.solr.ltr.feature.SolrFeature",
   "params" : {
           "q" : "{!func}recip( ms(NOW, lastModified), 3.16e-11, 1, 1)"
   }
   }
]
originalScore is the output Solr’s default scoring function. This score is a measure of how similar the document is to the query. This is typically calculated using the BM25 ranking function.titleLength and contentLength are the lengths of the title and page content respectively.titleScore and contentScore are the similarity scores of the title and content considered independent of each other. originalScore will by default be a function of these two.freshness is a measure of how recently the page’s contents were modified.We can now upload these features to Solr:
curl -XPUT 'http://localhost:8983/solr/nutch/schema/feature-store' --data-binary "@./data/features.json" -H 'Content-type:application/json'
If you’re ever dissatisfied with your feature-set, it can be deleted using a http request including the store name specified in features.json. In this case it is myfeature_store.
curl -XDELETE 'http://localhost:8983/solr/nutch/schema/feature-store/myfeature_store'
You can manually extract features for a certain query by making a curl request. For example, for the query ‘hello world’:
# -g (-globoff) ensures that curly and square brackets aren't ignored
curl -g 'http://localhost:8983/solr/nutch/select?indent=on&q=hello+world&wt=json&fl=title,score,[features%20efi.query=hello+world%20store=myfeature_store]'
Note that you will need to include the query both in its default position, and as a parameter passed on to the feature generator. This is because some of our features require the parameter query for their calculation.
Before you can train a ranker to learn to rank, you’ll need to prepare a testing and training set. This is typically done by eliciting user feeback via a rating system, or inferring preferred ranking by tracking the links users end up clicking on. For the purpose of this article, I’ve put together a small Python script that pulls the features for a number of queries and generates a file that can later be used in training a ranking algorithm, after the user has edited each document’s ranking to match their preferences.
I’ll illustrate how to use it with a small example. Invoking:
python data_gen.py -q Hello 'Hello World' -n 3
may result in the output:
# Q1 - hello
3 1:10.24 2:7.834294 3:0.82174814 4:8.901739 5:1.0 6:12.868973 # http://mediscuss.net/
2 1:655.36 2:8.396056 3:0.020180807 4:8.896537 5:40.96 6:2.6540499 # http://satherhealth.org/hello-world/
1 1:1024.0 2:7.360705 3:0.8651752 4:7.390079 5:4.0 6:0.0 # http://www.memozor.com/memory-tests/test-for-alzheimer-online
# Q2 - hello+world
3 1:655.36 2:8.396056 3:0.020180807 4:13.965097 5:40.96 6:2.6540499 # http://satherhealth.org/hello-world/
2 1:655.36 2:6.582241 3:0.020180807 4:10.373525 5:16.0 6:0.0 # http://satherhealth.org/
1 1:256.0 2:6.339876 3:0.38315034 4:9.991568 5:10.24 6:0.0 # http://www.eumed.it/feed
The first column indicates the similarity/relevance score the search engine assigned to the document, which you can modify to your pleasing. You’ll also notice that various comments (text following #s) are used to indicate each query and the urls corresponding to each row.
You can also use -i filename to read newline-delimited queries in from a text file and -o filename to save the output to a file. Also note that the script assumes that you named your feature store myfeature_store.
Make sure to save the final list of results with their rankings and features in training.dat. We’ll use this file later in training.
Learning to rank is a growing field, and there are a lot of high quality ranking algorithms to choose from. I’ll only cover SVM-Rank, because it is results in a simple linear model that is coincidentally one of the model types that Solr supports out of the box. Fortunately, SVM-Rank uses the same data format required by RankLib and Microsoft’s LightGBM, both of which provide high quality open-source implementations of rankers that employ Multiple Additive Regression Trees (The other model type with out-of-the-box support from Solr).
First, download, extract and build the classifier we’ll be using (SVM_rank):
wget http://download.joachims.org/svm_rank/current/svm_rank.tar.gz && \
 mkdir svm_rank && tar xzf svm_rank.tar.gz -C svm_rank && \
 cd svm_rank && \
 make && cd .. &&\
 rm svm_rank.tar.gz
Alternatively (and more conveniently), download the appropriate pre-compiled binary from the project website.
Once again, I’ve put together a small script that will train the model using the training data you put together (training.dat). Note that it assumes that you use the feature-set we defined above. If you change your features, make sure to inspect train_model.py and modify the variable model_template to match your feature-set.
Invoking it as demonstrated below will generate a model file (model.json) that you can upload to the Solr server:
python3 train_model.py training.dat -m model.json
Now upload the model file:
curl -XPUT 'http://localhost:8983/solr/nutch/schema/model-store' --data-binary "@./data/model.json" -H 'Content-type:application/json'
And voila! You can view your new model does:
curl -g 'http://localhost:8983/solr/nutch/query?q=hello+world&rq={!ltr%20model=mymodel%20efi.query=hello+world}&fl=url,title,[features]'
It may be useful to contrast these to Solr’s vanilla ranking:
curl http://localhost:8983/solr/nutch/query?q=hello+world&fl=url,title
Happy searching! :)