Assignment #2: Image Inpainting
Date handed out: 09/02/14; Due date: 02/03/14
PDF version
Overview
In this assignment you will implement and experiment with an image inpainting tool. This tool will be demonstrated in class in February 12 and will be discussed in the tutorial(s). You will be implementing a specific inpainting technique called Exemplar-Based Image Inpainting, which will add functionalities to the image manipulation graphical user interface (GUI) that you worked with in Assignment 1.
Right now, the goal of this assignment is four-fold:
- to become familiar with some local (i.e., patch-based) image analysis techniques discussed in class, including
- estimating image gradients
- computing curve normals
- comparing image patches
- to read and understand your very first computer vision research paper, describing a relatively recent, inpainting algorithm
- to read and understand the implementation of a non-trivial image manipulation technique and, especially, the data structures and mathematical tools it employs
- (optional) to gain some familiarity with a set of C++ data structures that are commonly used to implement simple 2D drawing operations
While the due date for the assignment is about 2 weeks away, it is strongly advised that you try to read the paper and go through the supplied code by lecture time, and begin coding as soon as possible. Because the assignment's due date is the week after reading week, if you have trouble undestanding the paper or parts of the supplied code, or if you are unsure of exactly what you have to do in your implementation, your best chance of getting your questions answered is to ask them before reading week (I will not be around during reading week and there will be no lecture or tutorial).
I suggest you complete Part A.1 of the assignment within the next few days and use the rest of your time for Part A.2 and Part B. Once you "get the hang of it," the programming part of the assignment should not be that hard, although it is more substantial than Assignment 1. On the other hand, there is *a lot* of already-written code that you must get familiar with, and it will take you some time to internalize exactly what you have to do, and how.
Instructions to develop locally on Windows and on MacOS are provided at the bottom of this page.
Image Inpainting
The technique you will implement is based on a paper by Antonio Criminisi, Patrick Perez and Kentaro Toyama at the 2003 Computer Vision and Pattern Recognition Conference (CVPR 2003). Unlike Assignment 1, here you do have to read and understand the paper. When reading a research paper you have to be selective in the parts that you want to fully understand. For this paper, skim the introduction (Section 1) to get some basic background and then skim Section 2. Your main focus should be Section 3, which describes the algorithm in full detail. Of particular importance to you will be Equation (1) on page 3 (and the unnumbered equations immediately after); Equation (2) on page 4; and the algorithm summary shown in Table 1 on page 4. In the supplied source code, each step in Table 1 corresponds to a method of a C++ class called inpainting. Most of these methods have been fully implemented for you. Your task is to complete those that are only partially completed, especifically those that implement Equations (1) and (2).
As with A1, you are also being provided with full implementations of the tool in executable form, along with a suite of test images, so that you can run it yourself and see how it works (see the executables partA/bin/VisComp_full.exe, partA/bin/viscomp_full and partA/bin/viscomp_full_mac in the assignment zipfile, for Windows, Linux and Mac respectively). The program should work for a variety of image formats (tif, jpeg, etc). I suggest you use very small images to test things out first (ie. 200x300 or less). In addition to the basic code, I am providing you with a few visualization tools that should help you with debugging, such as drawing the fill front, drawing individual patches, as well as drawing 2D vectors (see the supplied code for more details).
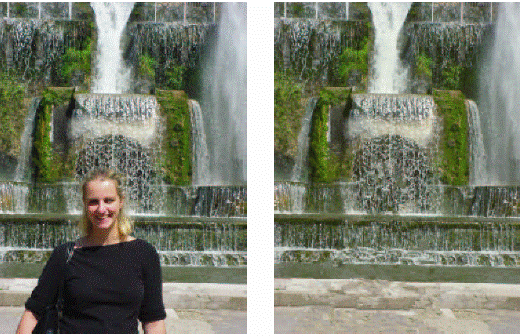
Briefly, the goal of the inpainting tool is to fill-in missing portions of a photo (e.g., scratches, pixels obscured by text, etc), or portions that a user wishes to remove (e.g., people, telephone poles, blurred objects, etc). An example of the process is shown below. The image on the left was the original photo. The image on the right was a photo created by the inpainting technique, where the pixels corresponding to the foreground subject were filled-in (i.e., "inpainted") with pixels from the background. To be visually convincing, the filled-in pixels must blend seamlessly with the original, untouched portion of the photo.
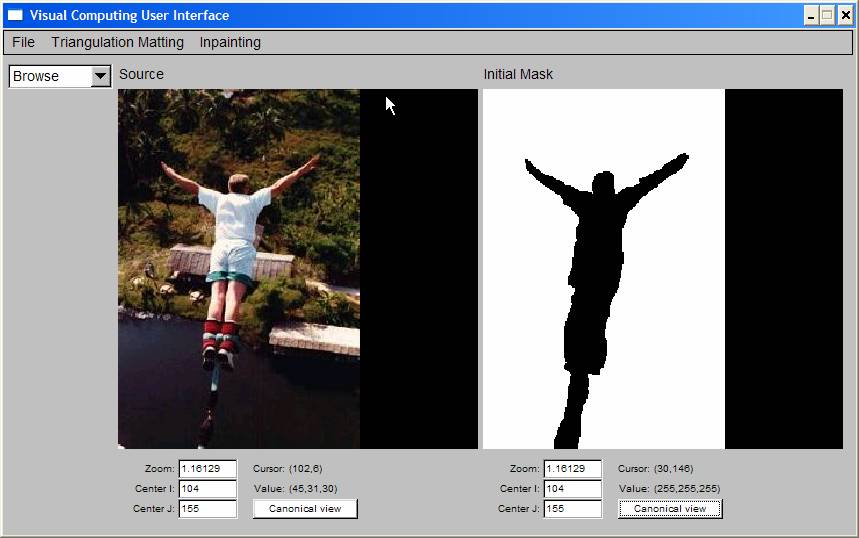
In our viscomp tool, the process works as follows. First, you load two images: the Source Image which is an original photo and an Initial Mask that tells us which pixels must be inpainted (ie. those whose intensity in the Initial Mask is equal to zero, called "unfilled") and which should be left alone (ie. those whose intensity in the Initial Mask is equal to 255, called "filled"). In summary, if the Initial Mask indicates 0 for a given pixel, then inpaint; if it indicates 255, then do not touch.
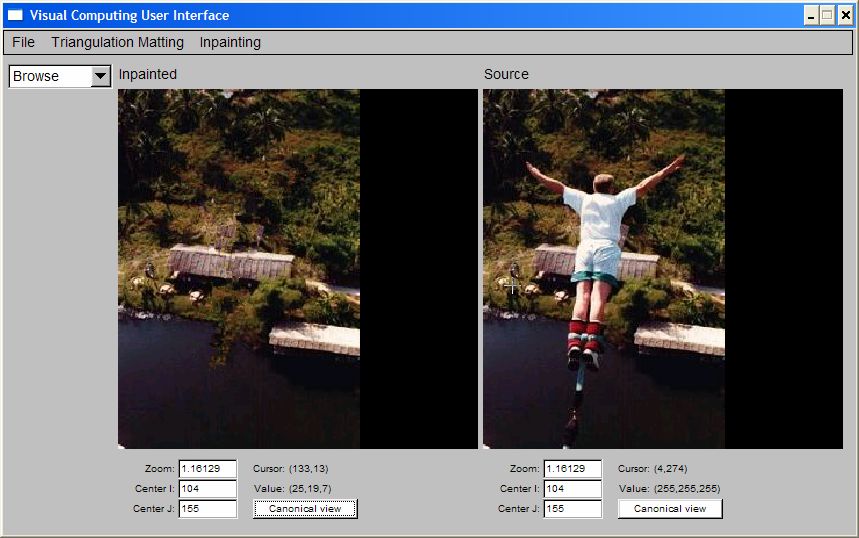
From this set of two photos, the inpainting algorithm computes an Inpainted Image, which fills in all the unfilled pixels with small patches of filled pixels from the original photo:
Interactive vs. Non-Interactive (batch) Operation
The supplied program can be run in interactive mode (ie. UI windows are displayed and user works through menus and/or keyboard accelerators), in batch mode (ie. user supplies a set of command-line options specifying the input and output images names) or both (ie. some or all command-line options are specified and, after images are loaded, the UI windows are displayed as well). Type 'viscomp -help' to see the command line options.
Other Features of the Interface
The interface you used for Assignment 1 has been extended in a number of ways. This includes debugging/visualization features useful for visualizing the progress & correctness of the inpainting algorithm; a facility that allows you to draw a mask over an image and then save it into a file or use it directly as input to your inpainting program; and the ability to apply the inpainting algorithm to the result of inpainting (eg., in order to re-inpaint regions of the inpainted image that don't look good).
Your Tasks
For this assignment you will have to do the following:
- Familiarize yourself with the inpainting algorithm
- Run your own inpainting experiments, by taking pictures with your digital camera (at home, outside, or anywhere else you'd like) and applying the inpainting algorithm to them (see Part B.1 of the assignment below). Please note that pictures from cellphones, tablets, webcams or any other type of digital imaging device, are all suitable for the purposes of this assignment.
- Implement the "missing" components of the inpainting algorithm and integrate them into the supplied "starter code" (see Part A of the assignment)
- Answer a set of written questions (see Part B.2 of the assignment)
I suggest you use the above order in tackling these tasks. Specifically:
- Read the paper right away and, in parallel, run the fully working implementation with "debugging on" to visualize exactly how the algorithm is supposed to work. See the file 320/Assignments/Inpainting/partA/README.1st for a brief description of how to run it (also available here).
- Take a look at the heavily-commented file src/inpainting/inpainting_algorithm.cxx. This file contains the top-level components of the algorithm which mirror exactly the steps of Table 1 in the paper.
- When writing your code, you should implement and debug each component piece by piece. I suggest the following order for your implementation (see Part A below for details):
- implement the method patch_db.lookup() in file patch_db.cxx
- implement the function compute_C() in file inpainting_eval.cxx
- implement the function compute_gradient() in file inpainting_eval.cxx
- implement the function compute_normal() in file inpainting_eval.cxx
- The written components of the assignment do not depend on your ability to implement the algorithm, so they can be done in parallel with your implementation.
- Based on the comments received in class, there are no additions to the UI that you will have to do for this assignment. Still, note that this GUI extends what you already saw in Assignment 1. My recommendation is that you browse through the changes made to the ImDraw class (listed in file imdraw_object.h, imdraw_object.cxx and imdraw_draw.cxx) which implement the drawing and display of simple 2D geometric objects.
Part A: Programming Component (70 Points)
Part A.0: Unpack the Helper Code
The helper code is packaged into the tarfile inpainting.tar.gz. The following sequence of commands will add files to your existing CS320 directory under your home directory on CDF and will unpack the code:
> cd ~
> tar xvfz inpainting.tar.gz
> rm inpainting.tar.gz
This will create the directory ~/CS320/Assignments/Inpainting along with files and subdirectories needed for the assignment. All the code that you will hand in should be in the same directory structure, exactly as specified in the details below.
Part A.1: Implementing the Exemplar-Based Inpainting Algorithm (70 points)
The goal of this part of the assignment is to implement the exemplar-based inpainting algorithm described in the paper. The algorithm takes three pieces of input---a color Source Image, a binary Initial Mask, and a patch radius (default radius is 4) and produces a single Inpainted image. This is an iterative algorithm, that inpaints the unfilled pixels patch by patch, and you can also control how many iterations the algorithm should run (the interface gives you the option of running the algorithm to completion or just running a fixed number of iterations at a time when a specific key is pressed).
- Your starting point: The file 320/Assignments/Inpainting/partA/README.1st gives a fairly complete description of the starter code.
- There are a very large number of components to the provided code. To efficiently succeed in this assignment, you need to concentrate on the parts directly relevent to the sections you will implement. After reading the README.1st file, you should be familiar with a lot of the code already, and the new additions will mirror some of the code you have seen. Three files are the most important. They implement the inpainting class. These files are under the src/inpainting subdirectory:
- First look at src/inpainting/inpainting.h. This file is where the class methods are defined, which provide the interface between the interactive UI and the inpainting algorithm.
- Second, look at src/psi.h. This file describes a set of methods that implement a class called psi, which is used to represent and manipulate patches. You do not need to worry about the implementation of the methods in psi.h (located in files psi.cxx and patch_db.cxx) but the code relies heavily on this class and so it's a good idea to understand what these methods do. Think of these methods as a toolbox that is available for you to use as well. By doing so, you could finish your implementation a lot faster.
- Then look at the inpainting::compute() and inpainting::inpaint_region() methods in file src/inpainting/inpainting_algorithm.cxx. These methods should give you a very concrete idea of how the algorithm is implemented, as well as what are the main data structures it uses. Of the two methods, the most important one is inpainting::inpaint_region(). The implementation, variable names, and comments of this method follow the terminology in the paper very closely so you should be able to read the code in parallel with the paper, and refer to the paper if there is something you don't understand in the code. All routines in file src/inpainting/inpainting_algorithm.cxx are fully implemented.
- The only components missing from the implementation are the functions patch_db.lookup(), compute_C(), compute_gradient() and compute_normal(). Your task for this part of the assignment is to write the code for these methods. The methods are called by the routines in src/inpainting/inpainting_algorithm.cxx. Detailed specs for these functions are given in file src/inpainting_eval.h. You should be able to know exactly what you have to implement from the comments, parameter lists, and callers of these four methods.
- The file inpainting.cxx contains the class constructor and various utility methods you may need. The methods in this file mirror the functionality provided by the methods in the matting.cxx file of Assignment 1.
- (15 points) Implement patch_db.lookup() in file inpainting/patch_db.cxx
- A detailed description of the input and output of this method can be found in the file inpainting/psi.h.
- (10 points) Implement compute_C()
- A detailed description of the input and output of this method can be found in the file inpainting/inpainting_eval.h
- (20 points) Implement compute_gradient(). Again, details can be found in file inpainting/inpainting_eval.h
- There are many ways of computing a pixel's image gradient. As long as your computation is correct, you will receive full marks regardless of your implementation (eg., using finite differences in a 3x3 window around the pixel; fitting a 1st-order 2D polynomial to the greyscale image intensities; etc).
- (25 points) Implement compute_normal(). Again, details can be found in file inpainting/inpainting_eval.h
- There are many ways of computing the unit normal at a point on a 2D curve. To receive full points, you should fit a 2nd-order polynomial to each of the curve's coordinate functions, using weighted least squares with a Gaussian weight function.
- Your starter code contains "dummy" versions of the above four methods, which allow the implementation to always produce an inpainted image as output. The only difference your implemenation will make is to produce a marked increase in the quality of the inpainted image!
- You should be able to run the algorithm in batch mode and save its results using the command-line invocation:
viscomp -no_gui -inpainting -isource <Source> -imask <Mask> -inpaint <Inpainted> -iradius <rad>
this will save the results in the image <Inpainted>.
- I would strongly recommend that you run the algorithm in interactive mode using step-by-step execution until you are fully convinced that everything is implemented correctly (see the README.1st file for details)
- If your implementation uses additional files (eg. if you split your implementation over multiple files under the inpainting/ directory) make a list of these files in the file src/ADDITIONS, along with a 1-2 sentense explanation of what is in them.
Part B: Non-Programming Component (30 points)
This part of the assignment is meant to assess your understanding some of the material covered recently in class, and to have you perform some inpainting experiments of your own!
Part B.1: Conduct your own Inpainting experiment (10 points)
Use your own digital camera to capture a set of images suitable for inpainting, and run the algorithm on those images.
Specifically, you need to
- capture 2 JPEG photos, Source1 and Source2, with your camera that will serve as two different source images (there need be no relation between the two photos---they could be photos of something totally different)
- create binary masks, Mask1 and Mask2, respectively, that mask out one or more elements in these photos.
- run the inpainting algorithm on these two input datasets, i.e (Source1, Mask1) and (Source2,Mask2). You can use either your own implementation or the fully-functional executable we supplied, to create your 2 output images, Inpainted1 and Inpainted2.
- the two source photos should NOT be arbitrary; in particular, you should choose them as follows:
- the region(s) to be deleted by inpainting should not just be constant-intensity regions (which are essentially trivial to inpaint)
- Source1 should correspond to a "good" case for inpainting, ie. it is possible to find a patch radius that produces an inpainted image without obvious seams or other artifacts
- Source2 should correspond to a "bad" case for inpainting, ie., it is not possible to find a patch radius that produces an inpainted image without obvious artifacts.
- CAUTION: you should name these images source1.jpg, mask1.jpg, source2.jpg, mask2.jpg, inpainted1.jpg, inpainted2.jpg.
- answer the questions in file 320/Assignments/Inpainting/partB/Written.txt (also available here) about how these images were taken, and about WHY Source1 is a good case for inpainting and Source2 is bad.
Part B.2: Written Homework Questions (20 points)
You can find the questions in the file 320/Assignments/Inpainting/partB/Written.txt (also available here).
Part B.3: Extra Credit: Beat my implementation! (up to 20 extra-credit points)
My implementation of the exemplar-based inpainting algorithm is a very basic one; it is quite slow and the inpainted images it produces are by no means the best one can hope to get. If you choose to re-implemenat some part of my code in a more sophisticated way (or if your implementation goes above and beyond what is asked for in this assignment description) you may well create an inpainting tool that either produces higher quality images or is significantly faster (with similar-quality output). Depending on what you do and how good your results are, you may get up to 20 extra-credit points.
Be sure to make a note in file 320/Assignments/Inpainting/CHECKLIST.txt of exactly what you did, and why you think you deserve extra credit. If you are claiming better results, place in the same directory (1) the source images and masks for which your implementation works better, (2) the inpainting results obtained by my implementation and by your implementation, and (3) any other parameters needed to run the algorithm (eg. patch radius).
Part C: Packing Everything Up and Turning It In
Once you are done with the above, edit the file 320/Assignments/Inpainting/CHECKLIST.txt (also available here) to specify which components of the assignment you have completed, along with notes about parts that you were not able to complete, if any.
Pack up your portion of the code with the following commands:
> cd ~/CS320/Assignments
> tar cvfz assign2.tar.gz Inpainting/CHECKLIST.txt Inpainting/partB/{WRITTEN.txt,*.jpg} Inpainting/partA/bin/viscomp Inpainting/partA/src/{Makefile,ADDITIONS} Inpainting/partA/src/inpainting
Finally, you should use CDF's assignment submission system to submit your assignment:
> submit -c csc320h -a Assign2 assign2.tar.gz
Note that the system has been configured (1) to accept only files whose name is assign2.tar.gz and (2) to not accept submissions that are more than 4 days late. Just do 'man submit' at the unix prompt to get more info on this process.
In evaluating your assignment, the first thing we will look for are the files CHECKLIST.txt and WRITTEN.txt.
Then we will make sure that your code compiles (just by typing "make" in the partA/src directory).
Then we will run your code on test examples in both the interactive and the non-interactive modes.
Finally, we will look at your code. It must be well commented: if the TA has doubts about the correctness of a specific implementational feature and there is not enough documentation/comments for the TA to decide, you will lose points. Good luck!
Using Visual C++ Under MS Windows (Win2k, WinXP, Vista, Windows 7)
IMPORTANT: You can develop A2 locally on windows, but your implementation MUST run on the Linux CDF machines and can only be submitted for linux.
Both fltk and VXL have been ported to windows and MacOS, making the choice of operating system completely transparent: the code I am providing compiles without any changes on both Linux, Windows 7 (using VisualC++ 8) and MacOS. You should, in principle, be able to work in Visual C++, copy your code to your CS320 directory on CDF, compile using the supplied linux makefile, and run. Give yourself some extra time if you choose to do this. Sometimes, bugs that do not seem to affect a program in VC++ cause coredumps on linux (and vice-versa).
If you plan to work with VC++ you have two options. The first one is to download the file 320CodeLib.zip (1.8GB !!!, almost 10 GB uncompressed!!) with the precompiled libraries and binaries for both VXL and FLTK for 64-bit machines. If this is your architecture, these binaries should work on your Windows computer with VC++ 8.0 (2005) installed. Note however that I will not offer any support if you encounter problems with it. Alternatively you may download sources for both VXL and fltk and compile them yourself. This distribution contains the latest libraries but older ones have worked. Once you decompress this file or compile the libraries yourself, you must add a system variable called 320CodeLibPath that points to the root of the decompressed files (instructions below) and the Visual Studio project uses that variable names. With all these prerequistites satisfied, you can then open the provide project file and press 'F7' to compile. I have heard that provided codes compiled with more recent releases of Visual C++/Visual Studio and with Windows 8, but there are no warantees or support on that end either.
To create a user system variable hit the "windows" key and type the word 'path' (without the quotes). This will open the Environment Variables window. Then press new (green box in the image below) and enter the name '320CodeLibPath' (without quotes) and the path where you decompressed the libraries.
Working on a Mac
IMPORTANT: You can develop A2 locally on your Mac, but your implementation MUST run on the Linux CDF machines and can only be submitted for linux.
Both fltk and VXL have been ported to windows and MacOS, making the choice of operating system completely transparent: the code I am providing compiles without any changes on both Linux, Windows 7 (using VisualC++ 8), and MacOS. You should, in principle, be able to work locally on your Mac, and once done, copy your code to your CS320 directory on CDF, compile using the supplied linux makefile, and run. Give yourself some extra time if you choose to do this to detect potential new bugs.
If you plan to work locally on your Mac, and you have compiled and installed VXL and FLTK already (for A1) the provided Makefile should work out of the box. If you have NOT compiled VXL and/or fltk follow the following instructions below, but please note that if you run into trouble NO FURTHER SUPPORT will be provided. If things do not work on your system you will have to figure out and fix the issues yourself. Note that the forum has a "Working on a Mac" section with a few extra comments and questions.