The 5 minute intro to using the PIC16F84A microcontroller
News
Aug. 13, 2009: There was a problem with the C code I posted initially, which I fixed. Get
a new version from below if you tried the code and it didn't work.
Facts
Writing and compiling code for the 16F84A
The thing is, there are people in this world who like to
program in assembly. I'm not one of them. We'll do C. This is
what's needed to compile C code for the PIC.
- a C compiler; I'm using the freely available SDCC
- a linker; I'm using the freely available gpasm/gplink part of gputils
Installing SDCC and gputils
Download the installation files from the links above, save them on your
hard drive, then double click them. When asked if the path to the binaries
should be added to the PATH answer yes.
Compiling C programs
Best to do an example. Let's say we want to alternately light two LEDs.
This little program will do it.
/* begin file led1.c */
/* the following three lines include some needed header files */
#include <stdlib.h>
#include <stdio.h>
#include <pic16f84a.h>

/* declare a variable i which we will use as counter */
unsigned int i;

/* define selected target processor */
#define __16F84A

void main(void) {
  /* set both ports as outputs */
  TRISA = TRISB = 0;

  /* start with 0V on all output pins/ports */
  PORTA = 0;
  PORTB = 0;

  /* an infinite loop; for ever run the following code */
  while(1) {
    PORTB = 0b00010000;  /* put 5V on pin 9 */

    /* do nothing for 40000 cycles
       you can think of this as a pause */
    for(i=0; i<40000; i++);

    PORTB = 0b00001000;  /* put 5V on pin 10 */

    for(i=0; i<40000; i++);  /* pause again */
  }
}
/* end file led1.c */
Edit a file named led1.c and write the code above in it. You can also
download the file from this link: led1.c
To compile led1.c, run this command:
sdcc -mpic14 -p16f84a led1.c
If it compiled successfully, there will be a led1.hex file in the same
directory. This is the file that you can load in picprog and write
it onto the chip. Otherwise, you can download led1.hex from this link:
led1.hex
Writing the program onto the chip
Once the .hex file is ready, I use a tiny program name picprog
to flash it onto the chip. This program is also free and can be found
at this link:
http://pic16f84.hit.bg/
On that page there is a very simple circuit which uses power from the
serial port of a PC. Obviously picprog uses the serial port to communicate
with the PIC16F84A.

picprog.exe is a standalone executable, meaning that you can just put it on your Desktop and doubleclick on it to run it. Once open, the program can:
- load a .hex file from the disk
- erase the contents of the PIC memory
- write the .hex to the PIC
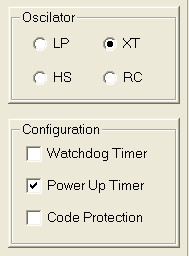
Note: the following picprog options worked for me
- Oscillator: XT
- Configuration: Watchod timer = off, Power up timer = on,
Code protection = off
- of course, choose the com port that you plugged your serial
cable into
For the led1.c/led1.hex example above, while in picprog:
- open the file led1.hex
- set the options as described above
- erase the chip
- write
- verify by exiting picprog, starting it again, and then
clicking on the "Read" button, which should retrieve the
program from the chip
Note: sometimes "Write" failed. I just exited picprog, wiggled
the breadboard wires, then tried again. Don't know why it sometimes
fails writing.
Running the program/chip
Once the program has been successfully loaded on the PIC16F84A
it's time to test it. A very simple circuit is all that's needed.
Like this
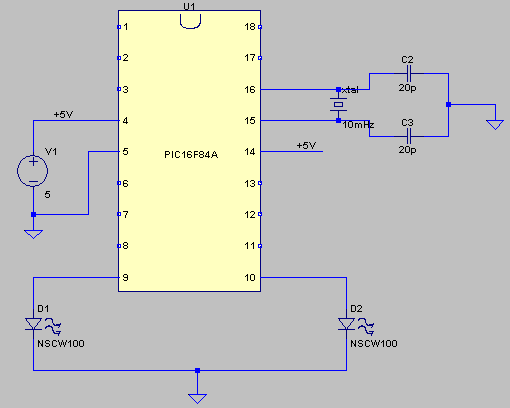
I've tried both a 10MHz crystal, as well as a 1.2MHz crystal, both
worked, at different speeds, of course.
As for the 5V DC source, in the interest of expediency I cut a USB cable
and found the appropriate two wires (in my case it was the red and black
wires).