Ray's CSC148H Tutorial Pages |
Compiled by Ray Ortigas
The following is an introduction to using CodeWarrior Pro 5 on CDF-PC. It covers the basic features you need to know in order to create and use a CodeWarrior project:
The example here uses the source file Student.java
and Section.java. Note that the code
is used purely to introduce CodeWarrior, and is not commented.
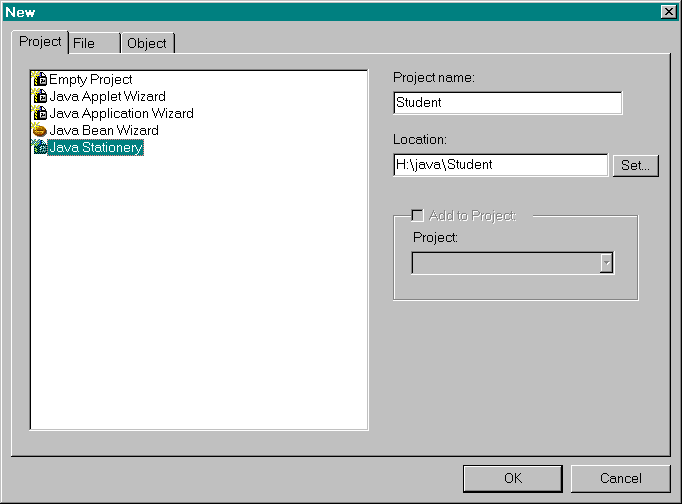
From the menu, choose File > New. A dialog will appear. Select the Project tabbed pane if it isn't already selected.
In the left side of the pane, select Java Stationery. This allows you to use CodeWarrior's project stationery, templates from which you can create a project.
You must also specify where you want to create the project. Click the Set... button to the right of the Location field. This will bring up a file dialog. Now,
java
on our H drive.Student.Then, click Save. The directory H:\java\Student\
will be created; this is your project directory.
When you're finished, the dialog should look like this:
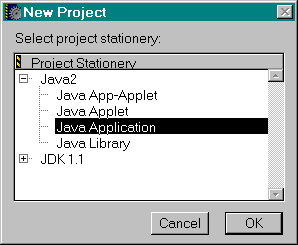
Now click OK. The following dialog will appear, asking you which type of stationery you wish to use:
Since you are working on a Java application, you should select the Java Application stationery. Click OK to start creating the project.
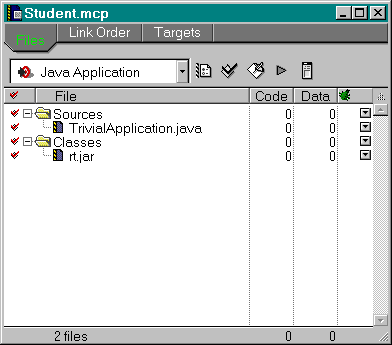
The following window should appear in the workspace:
This is your project window, which shows the contents of your project. Currently, your project contains a couple of groups (indicated by the folder icons) which have been automatically generated:
TrivialApplication.java. Eventually, you'll be adding more files
to this group.rt.jar,
which contains the Java API classes. This library is all you need to develop
conventional Java applications.You won't need TrivialApplication.java, so you can remove that
file from the project. Right-click on the file name and select Delete
from the menu that appears. When CodeWarrior asks you if you want to proceed,
press OK.
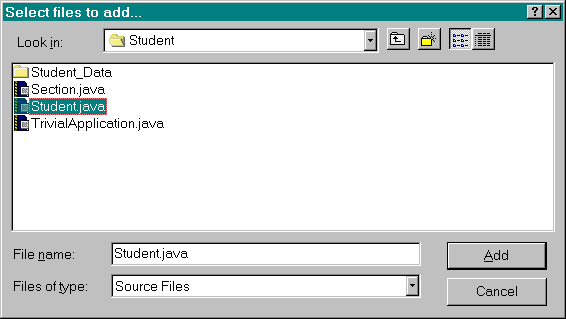
You will need to add the source files Student.java
and Section.java to your project. To
do this,
H:\java\Student\
in this example).You should see the following dialog:
Select Student.java and press Add. Follow the
same procedure to add Section.java. The two files should now appear
under the Sources group in the project window.
Next, you will add some source code of your own to the
project. Create a new file by selecting File
> New Text File from the menu. A new window
titled untitled should appear. In it, type the
following code:
public class Driver {
	public static void main( String[] args ) {
		Section sect = new Section(30);

		sect.addStudent( new Student( "Kermit", 3 ) );
		sect.addStudent( new Student( "Big Bird", 12 ) );

		Student s = sect.findStudent(3);
		System.out.println( s.getName() );
	}
}
Now, select Project > Add Window from
the menu. A new dialog will appear asking you what to save the document as.
In the File name field, type Driver.java and click
Save. The file should now appear under the Sources group
in the project window.
You are now ready to compile. In the project window, click the Make
button ![]() .
.
If you don't get any error messages while compiling, you can run the application.
However, before you do this, you must specify the class to execute. Click the
Java Application Settings button ![]() to bring up the dialog for the project settings. In the left pane of the dialog,
choose Target > Java Target. In the right pane, you'll see that
the value of the Main field, which specifies the class to execute, is
currently
to bring up the dialog for the project settings. In the left pane of the dialog,
choose Target > Java Target. In the right pane, you'll see that
the value of the Main field, which specifies the class to execute, is
currently TrivialApplication (the default). Change it to Driver.
When you're finished, the dialog should look like this:
Click Save, and close the dialog.
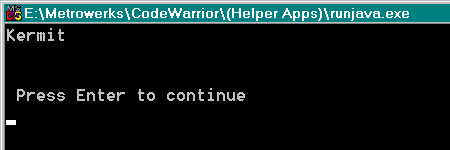
Now you can run your program by clicking the Run button ![]() . A DOS window should appear:
. A DOS window should appear:
You're done! Welcome to CodeWarrior.
| Main CSC148H Home Page This page is maintained by Ray Ortigas, a teaching assistant for CSC148H - Introduction to Computer Science at the Department of Computer Science, University of Toronto. If you have any questions or comments about this page, please send e-mail to Ray at rayo@cs.toronto.edu. Last updated September 16, 1999. |