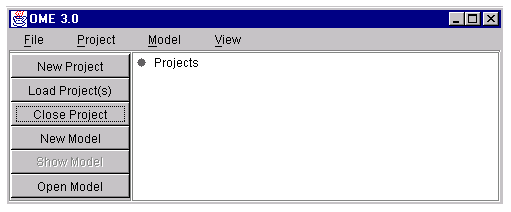
Figure 1: The OME window.
Organization Modeling Environment (OME)
User Manual
1. Introduction
The Organization Modeling Environment (OME) is a modeling tool, meant to aid in the development and representation of models developed in various modeling frameworks. It provides a graphical view of these models, which are themselves stored in a knowledge base. Users can use the graphical features of OME to aid in the development and modification of these models.
At the time this document was written, OME was capable to supporting the i* and NFR frameworks. However OME has been designed so that "Power-Users" can easily adapt it to support new modeling frameworks by providing users with Plugin routines to develop and analyze models of these frameworks.
This document aims to provide an introduction to the core functionality of OME. It would be difficult to provide a comprehensive explanation of all of OME’s features, as due to OME’s dynamic nature and extensibility, the features and interface of OME can vary significantly between users, and even between executions.
2. Downloading, Installation and Execution
Please note that at the time this document was written, OME was only supported on the Windows 95/98/NT platforms.
2.1 Downloading.
The latest version of OME is available for download via FTP from
http://www.cs.toronto.edu/km/ome/
2.2 Installation
Create directory (folder) where you want to keep your OME3 application files (e.g. C:\Program Files\ome3). Now extract the downloaded zip file into the newly created directory. Be sure to include all sub-directories when you do this.
2.3 Execution
If you had a previous version of the OME and thus copied the "Jre" directory into the newly created directory, you should run the "jome3.bat" file. Otherwise you should run the "ome3.bat" file. Both these files would be located in the newly created directory., where the OME application files were saved. For example if the application files were saved in "C:\ProgramFiles\ome3", you would run "C:\Program Files\ome3\ome3.bat".
3. Getting Started
Figure 1: The OME window.
When OME is initially started, a small window like the one in the Figure 1 below should appear.
This window consists of the OME Project View Manager, which is used to organize the various models developed. In OME, it is recommended but not necessary that all models be stored within projects. Thus at this stage, the first step typically consists of either creating a new project or opening an existing project. Once this has been done, the user can either modify existing models or create and develop new models within this project. (The user also has the option to open models that are not stored directly in any project, but as mentioned above, this is discouraged). Each of the possible options is described next.
3.1 Creating a new project
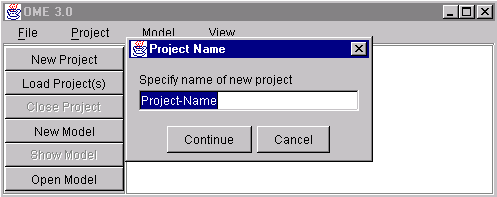
Figure 2: Creating a new project
Click on the button named "New Project". This will bring up a dialog requesting the user to type in the name of the new project. (See Figure 2 below.)
Complete this information and click on the "Continue" button. This will create a new project and add the project to the Project View.
3.2 Loading one or more existing projects
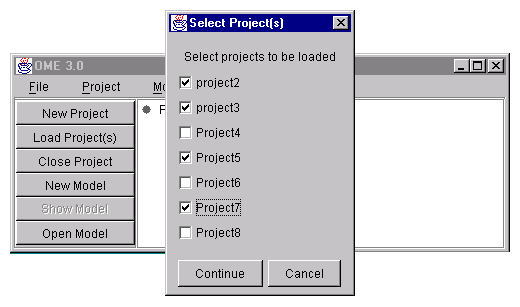
Figure 3: Loading one or more projects.
Click on the button named "Load Project(s)". This will bring up a dialog containing a list of the projects available to be loaded. (See Figure 3 below.)
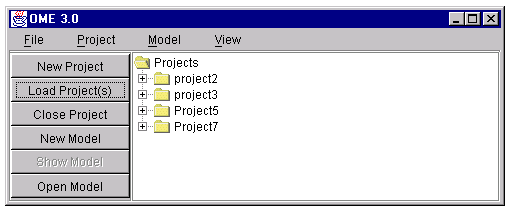
Figure 4: Loaded projects.
Check all projects that you wish to be loaded and click the "Continue" button. This will load all the projects and the models they contain, into the Project View. (See Figure 4 below.)
3.3 Closing an open project.
To close an open project, select the project in the Project View to be closed and click the "Close Project" button. This will remove the project from the Project View. Note this will not delete the project, but will merely remove the project from the Project View.
3.4 Creating a new model.

Figure 5: Creating a new model.
Click on the button named "New Model". This brings up a dialog requesting the name of new model, the project it will belong to, and the frameworks it will implement. (See Figure 5 below.)
Fill in the appropriate information and then click the "Continue" button. This will open up an empty model that supports the existing frameworks.
3.5 Showing an existing model.
Click on a model to select it. (See Figure 6 below.) Then click on the button named "Show Model". This will open up the selected model, which can then be modified or developed further by the user.
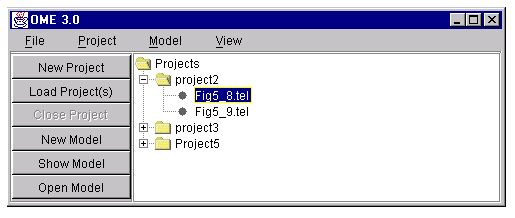
Figure 6: Selecting a model.
3.6 Opening an existing model.
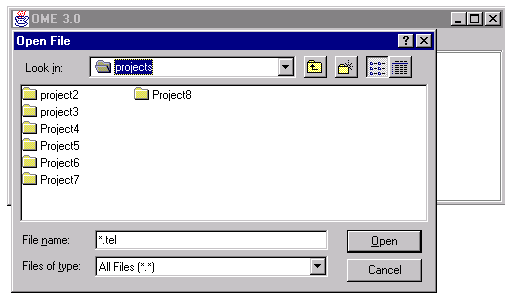
Figure 7: The File dialog.
Click on the button named "Open Model". This will open a File dialog as shown in Figure 7 below. Navigate through this dialog to choose the model to be opened. Then clicking on the button named "Open" in the dialog will open up the selected model.
4. Modeling with OME
Now that you have a (possibly empty) model loaded, you are ready to expand and modify the model. As noted before, it is impossible to give a detailed account of every feature and function of the graphical modeling interface. There are, however, a number of core functions and interaction techniques that every user of OME will need to be familiar with. These are outlined below:
Menu Bar:
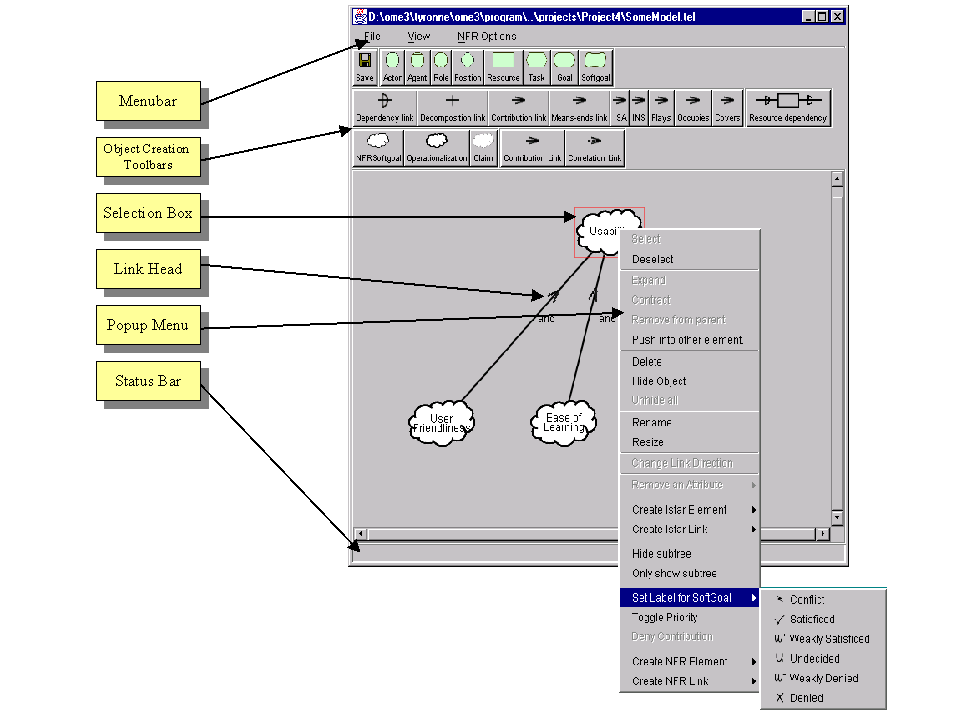
Typical to most graphical applications, the menu bar is located at the top of the window (see Figure 8) and provides access to a number of features. Plugins (described in Section 6) have access to the menu bar, so the menus located on the menu bar may vary depending on the model/frameworks being used.
Toolbars:
Toolbars provide easy one-button access to frequently used functionality. The toolbars can be found just beneath the menu bar. Plugins have access to the toolbars.
Creating Objects:
To add objects to your model is use the Object Creation Toolbars. To use the toolbar, simply press the button corresponding to the type of object you wish to add, and follow the instructions presented in the Status Bar (see below). These toolbars are automatically generated and can be used to create any object available in the model’s framework.
Pop-up Menu:
Clicking the right mouse button anywhere over the graph of the model will bring up the Pop-up Menu (see Figure 8). The Pop-up Menu provides access to a number important functions, including hiding, renaming and resizing objects. In addition, plugins may provide access to a number of useful routines through the Pop-up Menu.
Selecting Objects:
Objects can be selected with a mouse click. When an object is selected, a Selection Box (see Figure 8) will appear around the object. Multiple objects can be selected by holding down the CONTROL key and clicking on the additional objects you want to be selected.
Selecting Links:
Please note that links are only selectable at the "Link Head" (see Figure 8). The "Link Head" is where the link’s image (typically an arrow head) appears. Think of the "Link Head" as the only part of the link that is active (in an interface sense).
Deleting Objects:
Pressing the DELETE key will delete all selected objects from the model.
Moving Objects:
An element can moved in the graph by clicking on the element, and dragging the mouse while keeping the mouse button pressed. Links are always drawn as a straight line from their destination to their source and cannot be moved (except by moving the link’s destination or source.)
Expanding Objects:
Some modeling frameworks support the concept of expandable objects. As an example, in the i* framework, parts of a model can exist within the bounds of an Actor. When an object is expandable, it can be expanded by double-clicking on the object. Double-clicking on expanded object will contract the object (return it to a non-expanded state).
Expanding or contracting an object can also be done from the popup menu.
The Status Bar:
Occasionally, important information will be displayed on the Status Bar (see Figure 8).
NOTE: Unless explicitly stated otherwise, all interaction with menus, buttons, etc. is achieved by using the left mouse button. Many of the interaction techniques support the notion of context sensitivity. This means that they may appear or behave differently depending on the state of the model and interface. The Pop-up Menu is intended to be particularly context sensitive. In Figure 8, the Pop-up Menu was displayed in response to a right click on the "Usability" node. Notice the "Set Label for Softgoal" menu was active in this instance. This would not have been the case had click occurred over an empty area of graph, or over an object that was not an NFR Softgoal.
5. Saving and Exporting Models
In OME it is possible to save and export your model. Saving refers to storing a copy of your model on disk in order to use the model with OME at a later date. Exporting refers to saving a picture of the graphical representation of your model that can be used in other documents.
To save or export your model, simply select the appropriate option from the file menu in the graphical model interface. In either a case, a file dialog will appear allowing you to select the name of your saved/exported model, as well as its location.
Saved files are stored in .tel files. It is possible to alter these files in order to manipulate the model, without using OME. This practice is not recommended, however. Doing so might corrupt the state of the model.
Exported files are stored in .png picture format files. Any standard graphics application should be able to manipulate these images, and convert them to any other standard picture format. .png files can easily be included in word processor documents, or in web pages.
6. Plugins
One of the major goals in designing OME was to provide it with a flexible and extensible interface. This is accomplished though the use of plugins. A plugin is a program file that can be developed by someone other than a member of the OME team (typically the developer of a framework) that allows for additional functionality for models that use certain frameworks. For example, if someone had developed a Entity-Relationship framework to be used with OME, they could also include access to some analysis routines that would ensure that your model is in First, Second or Third Normal Form. The developer of this plugin would be able to write the code that makes these checks, add buttons or menus to the interface to provide the user with access to these routines, and even display a dialogue with output to the user.